Gatherling’s Time, Sunday, November 8, 2020
Selflessness
Memory Verse:
Phil 2:4 Let each of you look out not only for his own interests, but also for the interests of others.
Phil 2:4 Let each of you look out not only for his own interests, but also for the interests of others.
It can be hard for our kids to follow this sometimes, but if we model and talk to them about what this looks like we can encourage our kids to become more selfless.
Teach your child to be generous. 2 Corinthians 9:8 says, ” And God will provide all you need. Then you will always have everything you need and plenty left over to share with others.” Teach them to be thankful for what God has deemed necessary in their life. This could spill over into to a lesson about tithing. You could have your child donate some of his toys. You could also practice being generous by teaching your child to share.
Serve, serve, serve! The best way to teach your child to be selfless is to give him opportunities to serve others. If you are not able to set something up outside of the home, have him serve others inside of your home. Crown him/her the new dinner helper. Have him set the table, get napkins and drinks for everyone and require him to help clean up after dinner is over. Have him take out the trash or have your daughter help with laundry. Serving each other at home will help set them up for service outside of the home.
Some things your children can do to serve others at home:
Put away siblings laundry
Help mom with household chores (Vacuum, dust, dishes)
Help take care of animals
Clean a sibling‟s room
Pick up other‟s shoes from the front door and put them away
Help cook dinner and clean up afterwards
Some things your children can do outside of the home:
Volunteer to help stuff mailers at church
Visit elderly in nursing home
Help serve food at local homeless shelters
Activity: What Would Jesus Do? Bracelets
Supplies:
color beads, pipe cleaner, letter beads
Directions:
1. Put one colored bead through the pipe cleaner and tie the end.
2. Fill the bracelet halfway with colored beads.
3. Put the letters W, W, J, D, ? in the middle of the bracelet and then fill the rest of the pipe cleaner with colored beads.

Children’s Church, Sunday, November 22, 2020
Acorn Gratitude Banner Craft
This is a perfect activity to reflect with kids about all that we have to be grateful for as we prepare for Thanksgiving meals and time together.

Supplies:
- Brown construction or cardstock paper
- Acorn template–CLICK HERE or you can draw your own
- Scissors
- Markers
- twine
- clothes pin
Directions:
1. Either draw acorns on brown paper or print the template and trace onto the brown construction paper.
2. Cut the acorns.
3. If your kids are old enough, have them write things they are grateful for. Or you can write it for them.
4. Clip the acorns to twine with the clothes pins and display!
Check out these Gratitude Conversation Starters
Children’s Church, Sunday, November 15, 2020
Nature Scavenger Hunt
Get outside with your child today and go on a scavenger hunt! Share with your child all that God has created and what you are most thankful for!

Children’s Church, Sunday, November 8, 2020
I Am Thankful For… Craft
SUPPLIES:
Brown paper
Orange, red, and yellow construction paper
String, yarn, or pipe cleaner
holepunch
Marker
Scissor
Glue

DIRECTIONS:
1. Cut the brown paper into a cross shape.
2. Cut the yellow, orange, and red paper to make different square and rectangle shapes (you could also use tissue paper, though it may be harder to write on).
3. Ask your child, what are some things you are thankful for? and write those on each of the pieces of paper.
4. Glue those onto the cross, with the middle of the cross saying “I am Thankful for..”
5. Hole punch one hole at the top of the cross and attach either string, yarn, or pipe cleaner to hang it.
Children’s Church, Sunday, November 1, 2020
Child of God Crown Craft

SUPPLIES:
Crown template–CLICK HERE TO PRINT
Markers, paints
hole punch
string or elastic to attach crown pieces
DIRECTIONS:
1. Print the crown template.
2. Paint the crown with watercolor paints and a cue tip or cotton ball for an easy paint activity. You can also have your kiddo color their crown with crayons or markers.
3. Write “I am a Child of God” on the front of the crown when dry or finished coloring.
4. Hole punch the sides of both crowns and attach the two pieces together with a string or elastic.
Children’s Church, Sunday, October 25, 2020
Leaf Salt Painting
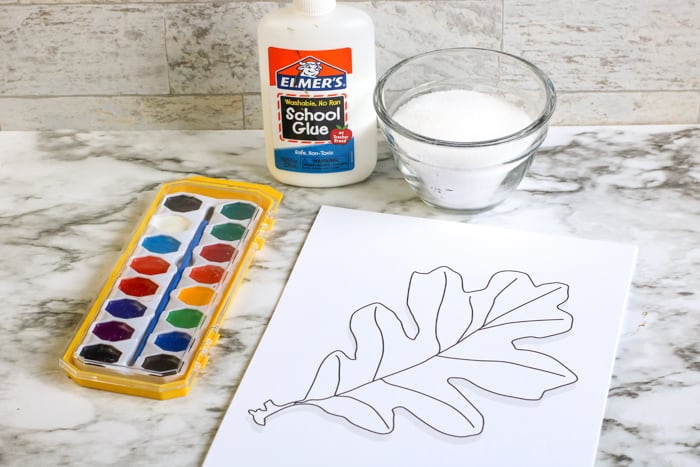
Supplies:
Leaves
Watercolor paints and brush
glue
salt
paper
Directions:
1. Either trace a leaf onto paper or print a template from online.
2. Trace glue around outline of leaf template.
3. Sprinkle glue with salt like you would glitter.
4. Gently lift the paper and shake off any excess salt.
5. Get the paintbrush wet and get plenty of watercolor paint on the brush.
6. Gently dip the brush to the salt. The salt will immediately absorb the color and spread.
Children’s Church, October 18, 2020
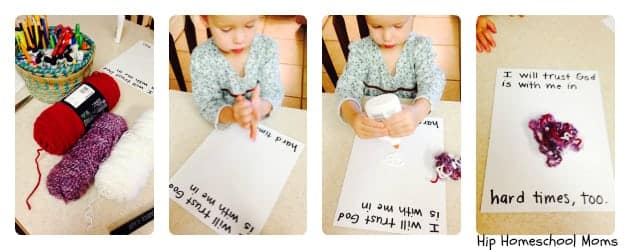
Trusting God Yarn Craft
Supplies:
Paper
Glue
Yarn (ribbon or thread)
Scissors
Directions:
1. Write on a piece of paper, “I will trust God is with me in hard times, too.”
2. Cut a few short strands of yarn (ribbon or thread works too); about 6-8inches long
3. Have kiddos tangle the yarn into a blob and glue onto the paper. Discuss with children how sometimes we make wrong choices and get into messes but that God is always faithful!
Children’s Church, Sunday, October 4, 2020
Taking Control of our Anger
It is often difficult as an adult to control our anger, so imagine how difficult it must be for children to understand this emotion and know what to “do” with their anger.
Below are some activities to help your kids talk about the feeling anger and what to do with it.
Draw about it- SelfdisciplineActivitySheet
Talk about what makes them angry and how to address it- StepSheettoManagingYourAnger
Children’s Church, Sunday, September 27, 2020
Finding Joy!
What are some things that bring your family joy? Discuss this with your children and DO some of them!
Children’s Church, Sunday, September 20, 2020
Jesus Heals
It’s good for kids to know that it is ok to feel sad at times and that when they do, Jesus is there to comfort them!
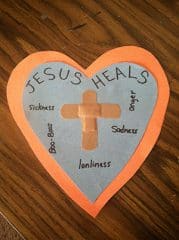
Supplies:
Colored paper
Scissors
Glue
markers, crayons
Band aids
Directions:
1. Cut out two color hearts from paper
2. Glue the smaller heart on top.
3. Discuss with your child things that Jesus heals, like sadness, loneliness, anger, etc. and write these on the inner heart.
4. Then the fun part! Have your child place band-aids in the shape of cross or whatever they like on the hearts!
Know someone who is sad? Send them this cute butterfly Feel Better card!
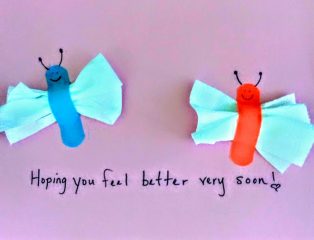
Supplies:
paper (for the card)
band-aids
tissue paper
markers
Directions:
1. Cut square pieces of tissue paper for the wings and fold accordion style.
2. Using a band-aid, attach the tissue paper wings to the card.
3. Draw a face and antenna on the butterfly and write a message to the person before sending!